How To Use External Synths with Logic Pro: A Complete Workflow
Working with external synthesizers inside Logic Pro can feel complicated at first. Routing cables, configuring MIDI, and making sure audio flows correctly can be frustrating if you don’t have a plan. After a lot of trial and error, I’ve developed a workflow that makes the process simple, creative, and reliable. In this post, I’ll walk you through how to set it up, how I use it in practice, and a few tips for getting the most out of your hardware synths alongside Logic.
Step 1: Make the Physical Connections
To integrate a hardware synth with Logic, you’ll need:
A computer
A synthesizer with MIDI in/out (5-pin, 3.5mm, or USB)
An audio interface with available inputs
MIDI and audio cables
Missing something? I put together an Amazon list for you: HERE
First, connect the MIDI ports of your synth to your computer or interface. If your synth has USB, you can connect it directly. If not, use 5-pin MIDI cables into your audio interface or a dedicated MIDI interface. Next, patch the audio outputs of your synth into your audio interface (mono or stereo depending on your setup).

Setup diagram using MIDI Cables
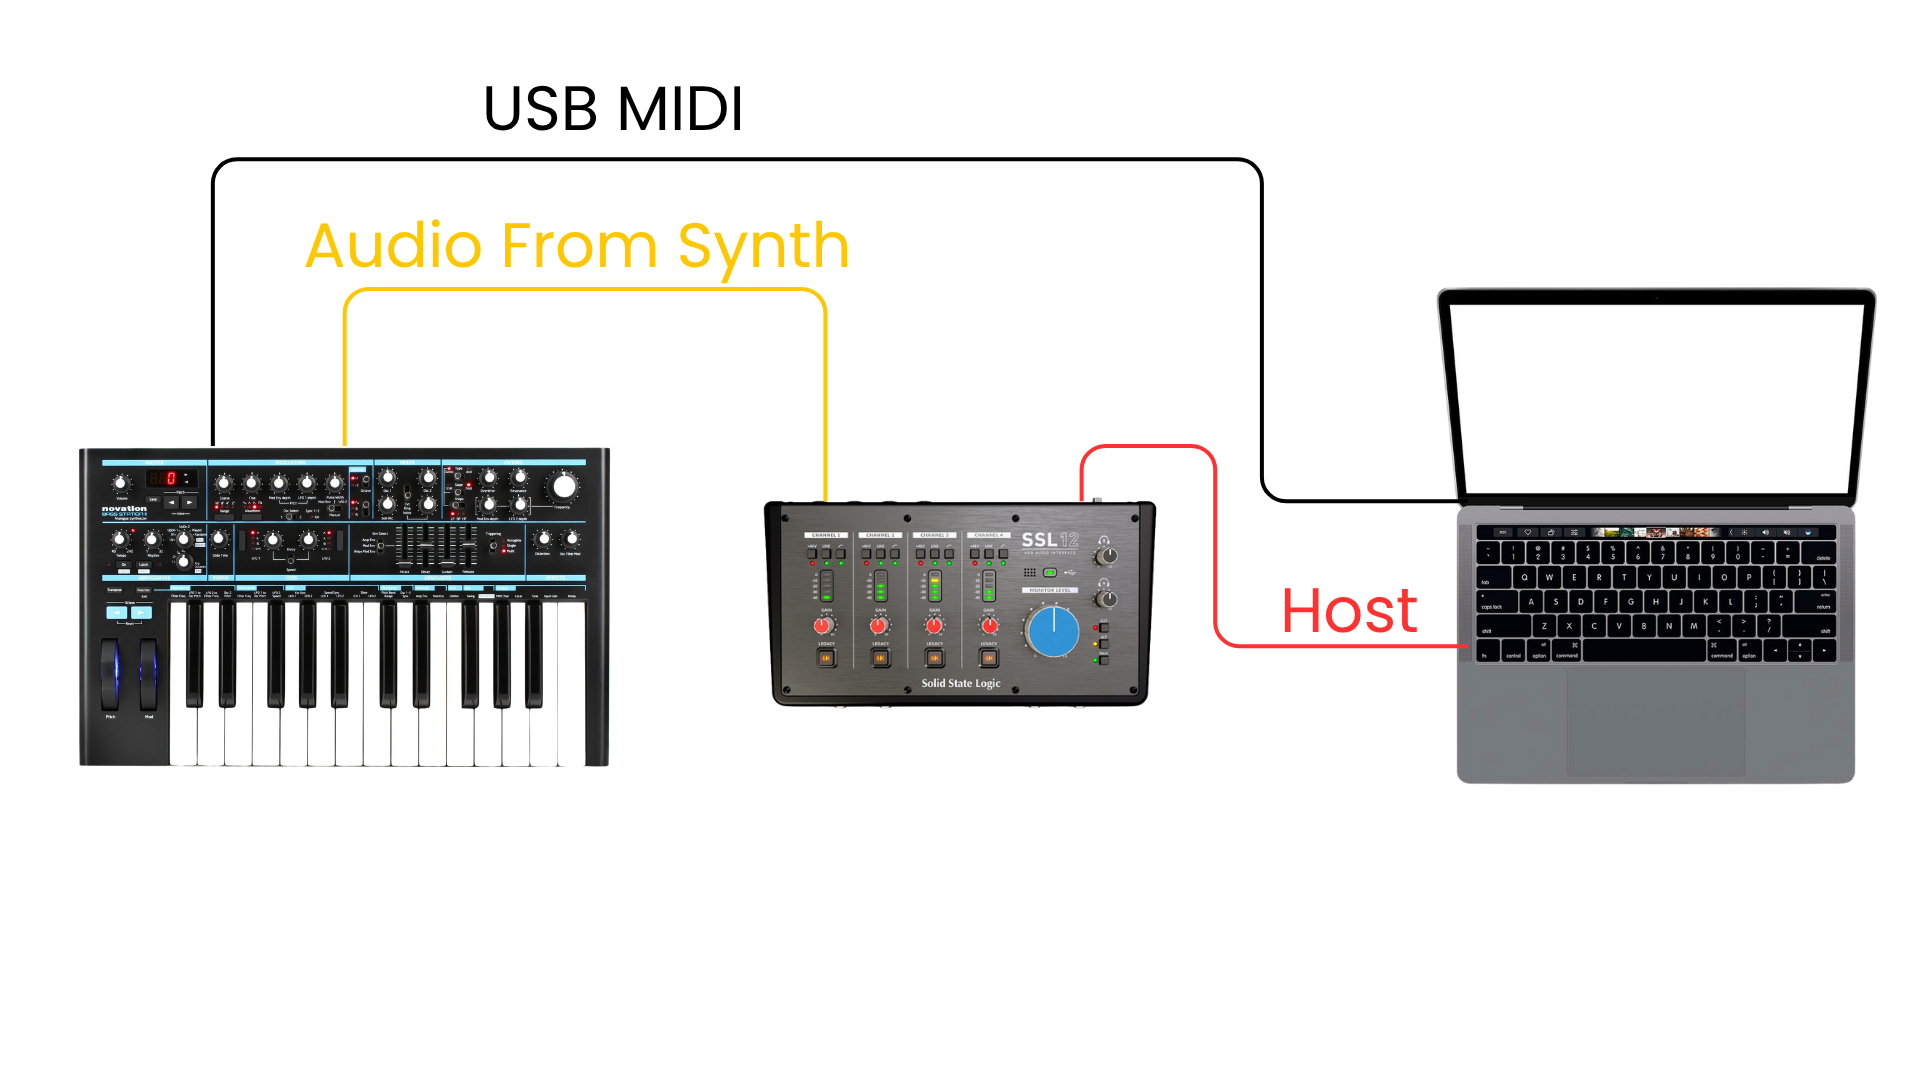
Setup diagram using a USB MIDI connection
Step 2: Configure Logic Pro
Inside Logic, create a new External MIDI track. Use the External Instrument plugin to link your synth to the DAW. Choose the correct MIDI destination (USB, interface, etc.) and set the audio input to the channel where you connected your synth. At this point, you should be able to play your synth and hear it through Logic.

Create a new external MIDI track

External Instrument Plugin
Step 3: Record and Edit MIDI
When you record on this track, Logic captures MIDI data rather than audio. That means you can play your synth, record a performance, and then edit the MIDI notes later — while still triggering your hardware synth in real time. It’s the best of both worlds: human performance plus editing flexibility.
You can also record MIDI CC data. Many modern synths automatically send knob and slider movements as CC messages. Record them into Logic, and your filter sweeps and parameter changes will play back just as if you were turning the knobs again. For this, you may need to make sure your synth is transmitting MIDI CC information, you can do this in your synth’s settings menu.
Step 4: Work with MIDI Channels
If you have multiple synths, assign each one its own MIDI channel. This way you won’t run into a situation where all of your synths are playing all of your other synths - it sounds cool but it gets old quick, trust me! In my setup, my Bass Station is on channel 3 and my MicroKorg is on channel 2, which makes it easy to switch between them.
Step 5: Commit to Audio
Eventually, you’ll want to print your synth performance to audio. This locks in the sound and ensures your project doesn’t rely on having every piece of hardware connected exactly the same way later. To do this, create new audio tracks, set their inputs to your synth’s channels, and record. Don’t forget to transfer any software effects you were using so they carry over to the new audio tracks.
Why This Workflow Works
This method keeps your creative options open while still giving you the control and reliability of working in audio. You can perform, edit, automate parameters, and experiment with MIDI effects — then bounce it all down once you’re happy with the result. Plus it just feels super inspiring to have Logic triggering real gear that you can perform, create and tweak to your heart’s content.
One of my favorite tricks is looping a section of MIDI and letting Logic play it back while I tweak the hardware synth. It frees me up to focus on sound design instead of juggling both playing and adjusting knobs at the same time. You can also use Logic’s MIDI effects like the Arpeggiator to send creative sequences into your synth.
Final Thoughts
Working with external synths in Logic Pro doesn’t have to be a headache. With the right connections, the External Instrument plugin, and a little planning around MIDI channels, you can make hardware a seamless part of your workflow. For me, it’s unlocked a hybrid approach where the hands-on feel of synths meets the power of Logic’s editing and effects.
If you want to dive deeper, check out the full video walkthrough I made on this exact workflow. If you’d like a free copy of my Logic hotkey guide, click HERE.